
Fabric Storage Basket

Fabric storage basket
Made for Ochre and Ocre using our Organic Cotton fabric by the very talented Ali Burdon from Very Berry Homemade.
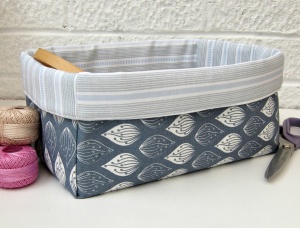
Finished storage basket
This is a good, straightforward project for someone new to sewing because there aren’t any complicated techniques or stitching required. The finished basket is shoebox sized, and a great place to store sewing notions, fabric scraps, or it could have a myriad of household uses.
Project Notes
- Working with heavier weight fabrics like these beautiful prints from Ochre and Ocre requires a sturdy needle – I recommend a 90/14.
- You will need to strengthen the outer fabric and the inner fabric to give your basket a sturdy finish. I recommend using Vilene H640 fusible fleece (a medium loft fusible fleece) plus Vilene S320 interfacing (a firm woven iron-on interfacing), but feel free to experiment or use your own favourites. Always follow the manufacturer’s instructions when applying interfacings or fusibles.
- The seam allowance is 1cm throughout.
Step 1
Cut a piece of outer fabric (I used Isabella in Campden blue) measuring 49cm by 58cm.
Cut a piece of inner fabric (I used Ledbury in blue/grey) measuring 49cm by 58cm.
Cut a piece of medium loft fusible fleece measuring 49cm by 58cm.
Cut a piece of firm iron-on interfacing measuring 49cm by 58cm.
Step 2
Take the outer piece of fabric and cut out a 15cm square section at each of the four corners. (Pic 1).

Cutting out the squares
Repeat for the other fabric, the interfacing and fusible fleece. (Pic 2).

Cut out the pieces
Fuse the fusible fleece to the outer fabric.
Fuse the iron-on interfacing to the inner fabric.
Step 3
Take the outer section and, right sides together, bring two of the short corner edges together and pin.

Stitch the seam, reverse stitching at each end of the row to secure.

Repeat this process at the other three corners to create a box shape. (Pic 5). Repeat the process with the lining fabric.

Step 4
Trim all the seams to about 6mm and trim off some of the bulk of the fusible fleece within the seam allowances of the lining section.

Press the seams very thoroughly so that you get nice sharp edges, using a knitting needle or crochet hook to push out the corners. Press the seams to one side (rather than pressing them open) – pressing in one direction on the lining section and in the other direction on the outer section.
Step 5
Keep the basket lining section with the fabric side on the inside and turn the outer section so it is right side (fabric side) out. Put the lining section into the outer section so that they are right sides together and so that the firm interfacing is on the outside of the basket. Line up the seams and then pin all round the top.

Make sure that the seam allowances on the the lining and outer are pressed in opposite directions

Step 6
If you can, remove the free arm cover on your sewing machine – this will make the next step easier. Starting 2/3 of the way along one of the long sides, stitch round the top edge of the basket, reverse stitching at the beginning. Continue around, but stop about 12-14cm from your starting point, reverse stitching again to secure.
Step 7
Use the gap you left in the top edge to turn the basket right sides out and push the lining section so that it sits neatly inside the outer. Press the top seam really thoroughly to create a sharp top edge, turning the edges of the gap in the top seam inwards so that they match up with the rest of the seam line. Use a little bit of fabric glue or pins on the open edge to keep the gap closed. Press, press, and press some more to get a really neat finish.
Step 8
If you can, select a slightly longer stitch on your sewing machine (I use 2.6mm) and stitch round the top edge of the basket, 2-3mm from the top edge. This is the trickiest bit, because you want to keep it very neat, and there are some bulky sections. Take it slowly, ease the basket corners under the presser foot and you will be fine. Don’t reverse stitch at the ends of your row of stitching this time, but leave long ends of thread at the start and finish so that you can tie them off. When you have finished the top stitching, knot the 2 thread ends on the outside of the basket, then thread them (together) onto a needle. Working along the seam line, push the needle between the fabric layers (don’t push it all the way through to the inside of the basket) and back out again about 3cm further along. Pull gently until the knot pops through between the layers of fabric, then cut off the threads. Repeat for the other 2 threads on the basket inner. Your beautiful top-stitching is secured invisibly!
Step 9
If you like you can fold the top edge down by about 4cm to create a rim, but I think the basket looks equally good (although not quite so sturdy) with the sides left as they are.


Now fill with goodies and enjoy your handiwork!
If you fancy giving this a go why not request one of our free Ochre and Ocre swatch cards so you can plan which designs and colours to use – we think it’s good to mix and match a bit, and you will find our colours work well together. Or you can view our full collection on our website.
Related articles


Ochre and Ocre Homewares


Recent Comments